Sunday, June 29, 2014
random
Looks like I need to post a little more often. Time flew by and also had trouble bringing up page when I wanted to, not once, but several times this month. Finally had a little more rain this month, but not enough to make a difference in the lake level but enough to make the grass green and the plants grow, and the grasshoppers take over. Why do they seem to want to take over every year? I'm thinking that I will need a greenhouse to grow anything edible just so I can keep them out.

Monday, May 26, 2014
My Border Blocks on my "Friends in the Garden" quilt
Nineteen years ago, I started a quilt and finished it in a reasonable amount of time, even with hand quilting it! The blocks were part of a quilt bee block exchange. Each month a different person in the bee would decide on the block pattern and have the members make blocks using a selected fabric with other fabrics added. That person would get those blocks. The bee wasn't big enough to make the number of blocks needed so I did end up making more. Once they were put together, I added my own border to it.
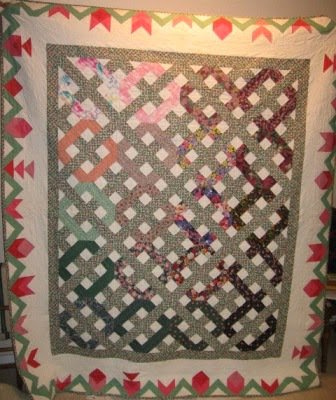
It is a stylized floral block border and I used a technique I had learned that past year - how to make flying geese the fast way. Over these years, I've found that there are a number of quick ways to make flying geese blocks, all relatively simple, including a 3-Dimensional flying geese. They range from 2 different sized squares (which Eleanor Burns demonstrates in a video) to the square in a square method developed by Jodi Barrows. You can find them all on the internet.
Some of the border blocks up close:

There are two basic blocks in the border.
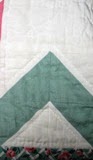 1: The leaf or connecting block is a 4 patch of half square triangles in green and white with a top bar of the white background. Some could have been made with two flying geese but to get the length I needed to make each side, it was necessary to make them as half square triangles so I could change size as needed and not lose the points of the leaves.
2: The 2nd block is the floral block; a unit consisting of up to 3 flying geese blocks and a bar if needed. From those flying geese blocks and the bar, I was able to get 8 + different floral looks by varying the placement of 4 colors: pink, darker pink, red, and white. The placement of the green for the leaves was kept standard in all those floral blocks. The only block arrangements I didn't use were #7 and #8.
Here's the starting blocks for those pictures. Ones that you can copy, print, and play with colors yourself: They are NOT to correct size though and don't show the seam allowance, but just for you to see how color makes a difference. There are 8 different settings but once you add color, they will seem to make even more. Note that the bottom F.G. block is the same configuration in each, because plants have to have leaves.


When completed, the top was layered and then hand quilted by some friends and myself then the quilt has since been used as a guest quilt. Most of the center blocks were signed by the persons who made them; the quilters who helped me hand quilt, signed the leaves. A label was then made for the back. To personalize it even more, I've asked guests over the years to sign and date the floral border blocks when they stay overnight. It's fun to read who in the family and my friends who have come for an overnight and when they did.

It is a stylized floral block border and I used a technique I had learned that past year - how to make flying geese the fast way. Over these years, I've found that there are a number of quick ways to make flying geese blocks, all relatively simple, including a 3-Dimensional flying geese. They range from 2 different sized squares (which Eleanor Burns demonstrates in a video) to the square in a square method developed by Jodi Barrows. You can find them all on the internet.
Some of the border blocks up close:
There are two basic blocks in the border.
 |
| Block #1 |
1: The leaf or connecting block is a 4 patch of half square triangles in green and white with a top bar of the white background. Some could have been made with two flying geese but to get the length I needed to make each side, it was necessary to make them as half square triangles so I could change size as needed and not lose the points of the leaves.2: The 2nd block is the floral block; a unit consisting of up to 3 flying geese blocks and a bar if needed. From those flying geese blocks and the bar, I was able to get 8 + different floral looks by varying the placement of 4 colors: pink, darker pink, red, and white. The placement of the green for the leaves was kept standard in all those floral blocks. The only block arrangements I didn't use were #7 and #8.
Just varying the placement of the colors in each flying geese block changed the look of the "flower".
Here's the starting blocks for those pictures. Ones that you can copy, print, and play with colors yourself: They are NOT to correct size though and don't show the seam allowance, but just for you to see how color makes a difference. There are 8 different settings but once you add color, they will seem to make even more. Note that the bottom F.G. block is the same configuration in each, because plants have to have leaves.
Block #7 & #8 Not Used in border
Friday, May 2, 2014
My Jacob's Ladder Project # 4
It's been a few weeks since I've posted on this project. Not much accomplished other than all the fat quarters have been marked. I ended up deciding to use my walking foot to finish the rest of the marked fat quarters as I found that that foot was the key to keep the lines straight for cutting. However, I don't get to the project often, (like once a week if I'm lucky), so only 5 fat quarters have been cut so far. Still have a bunch to sew and cut.
Last week attended my bee and kind of timed myself with sewing one fat quarter. It takes about 20 minutes to do one. Not long at all so why haven't I finished them by now?
I've been putting the Sewn and cut pieces in small zip lock bags. 1 bag for the one color blocks, 1 bag for the 2-color blocks, and the rest get put in the container for the scrappy j.l. So, now it looks like it's time to stop writing and get to work.
Continued in #5
Last week attended my bee and kind of timed myself with sewing one fat quarter. It takes about 20 minutes to do one. Not long at all so why haven't I finished them by now?
I've been putting the Sewn and cut pieces in small zip lock bags. 1 bag for the one color blocks, 1 bag for the 2-color blocks, and the rest get put in the container for the scrappy j.l. So, now it looks like it's time to stop writing and get to work.
Continued in #5
A little walk in our back field
April 22, 2014:
Browsed the field today. Found more plant damage from last week's hard frost. It even hit the poison ivy on the fence line. The Big Fruit Evening Primrose and the False Indigo Bush were also hit hard by the hard frost. But others seemed to survive with no ill effect. The Yuccas are getting ready to bloom and the Snow on the Prairie are coming up quite well where their parent plants were last year. Will have to thin them out.
May 2, 2014
Looks like I didn't get back to finishing the above entry. The frost damage has been overcome by most of the plants affected, with new leaves coming out.
and the flowers have been coming out in the lower field. In the front, the Painted Daisies look like they'll be flowering by the end of next week. We only had a couple of inches of rain last month so the ground is already dry. Supposed to heat up later this week so no rain in sight yet.

Tuesday, April 8, 2014
My Jacob's Ladder Project # 3
After cutting the 2nd set of colors, decided that I'm going back to the old way of just cutting out the block strips first, then start the sewing. or maybe I'll just try one more time and use the walking foot. The difficulty with the larger fat quarter size fabric was trying to cut the blocks apart after sewing them. The lines drawn seemed to shift about and I kept having to move the ruler to try and make a straight cut. One whole line of the 2.5 inch blocks sewn turned out about a 1/16th to 1/8th of an inch off. Too much and I'll have to make the seams smaller when I sew the next blocks to those.
continued in # 4
continued in # 4
Friday, March 28, 2014
My Jacob's Ladder Project # 2
Yesterday spent time with my bee and took along the Jacob's Ladder project. When my guild had it's quilt show, I had purchased a number fat quarters of different calicos from vendors there, enough to work on the 3 quilt tops that were already started. Then my brainstorm of marking the fabric in the last post.
It worked! though I wasn't so sure after marking the first one (probably because I was using the wrong marking tool). I switched to a pencil for the 2nd one. Thought I probably wouldn't continue that way but after sewing up the pieces for the first one, decided it was worth the time to mark the fabric and sew before cutting apart. It was so easy to do though it took me two hours to get that first one marked, sewn, and cut. The second one took half that time but I did have to take out some stitches because I was over enthused by the process and didn't watch closely where to stop and turn.
I did run into one problem when sewing on the diagonal. The fabric appeared puffed up after the sewing was done. At least I had over-sized the half square triangle units by 1/8 inch. I'll have to try the walking foot for the next one I mark up or change directions of the diagonals when I mark. BTW, the colored fabric was layered with the background fabric in case you're wondering what's going on. In this case I just used plain muslin.

Here's what it looked like after it was sewn and before I did the cutting.
Did decide that I didn't need to mark the cutting lines for the individual 2 1/2" squares as I can easily do that part when I'm cutting those 2 1/2" squares from the strips... after the strips have been sewn.
Looks like I might have to make another just so you can see the markings better and make the sewing more visible.
It was really nice though to be able to have most of the sewing done while uncut. Next step will be to iron then sew the 4-patches together then build the block. Oh, and the 1/2 square units will have to be slightly trimmed to correct size of 4 1/2" inches sq.
I haven't described the Jacob's ladder project that I'm doing. The picture of the original old quilt is on the first part.
The first quilt will use one color blocks, probably without sashing but I might change my mind on that.. Then there will be two quilts with 2-color blocks similar to the old quilt, and the 4th quilt will be scrappy, mixing up all the colors that I've cut from these fat quarters. The 2nd and 3rd will have sashing like the old quilt as will the scrappy one.
I had to split up the 2-color blocks as I noticed that the light/dark ones didn't look good with the dark/light blocks so that is why there are two quilts being made with these.

It worked! though I wasn't so sure after marking the first one (probably because I was using the wrong marking tool). I switched to a pencil for the 2nd one. Thought I probably wouldn't continue that way but after sewing up the pieces for the first one, decided it was worth the time to mark the fabric and sew before cutting apart. It was so easy to do though it took me two hours to get that first one marked, sewn, and cut. The second one took half that time but I did have to take out some stitches because I was over enthused by the process and didn't watch closely where to stop and turn.
I did run into one problem when sewing on the diagonal. The fabric appeared puffed up after the sewing was done. At least I had over-sized the half square triangle units by 1/8 inch. I'll have to try the walking foot for the next one I mark up or change directions of the diagonals when I mark. BTW, the colored fabric was layered with the background fabric in case you're wondering what's going on. In this case I just used plain muslin.
Here's what it looked like after it was sewn and before I did the cutting.
Did decide that I didn't need to mark the cutting lines for the individual 2 1/2" squares as I can easily do that part when I'm cutting those 2 1/2" squares from the strips... after the strips have been sewn.
Looks like I might have to make another just so you can see the markings better and make the sewing more visible.
It was really nice though to be able to have most of the sewing done while uncut. Next step will be to iron then sew the 4-patches together then build the block. Oh, and the 1/2 square units will have to be slightly trimmed to correct size of 4 1/2" inches sq.
I haven't described the Jacob's ladder project that I'm doing. The picture of the original old quilt is on the first part.
The first quilt will use one color blocks, probably without sashing but I might change my mind on that.. Then there will be two quilts with 2-color blocks similar to the old quilt, and the 4th quilt will be scrappy, mixing up all the colors that I've cut from these fat quarters. The 2nd and 3rd will have sashing like the old quilt as will the scrappy one.
I had to split up the 2-color blocks as I noticed that the light/dark ones didn't look good with the dark/light blocks so that is why there are two quilts being made with these.
These are some of the blocks I had finished up last year though in that picture, I was just playing around with the colors.
continued in # 3
Saturday, March 8, 2014
A couple of museum quilts from the Civil War.
Looks like I'll be missing the Dallas Quilt show this weekend but I did view a couple of old Civil War quilts at the Texas Civil War Museum in Fort Worth today. You may click on the pics to view larger.
 One was an impressive log cabin style quilt (Barn Raising pattern) with embroidery done along the logs of the log cabins. Every log seemed to have the same embroidery stitch called the Herringbone stitch, a stitch usually used to decoratively sew two patches together but in this case used as a lovely edging stitch. The embroidery thread color of the dark "logs" varied with green, yellow, or red which highlights the embroidery. White appeared to be the primary embroidery thread used in the white "logs." The logs are in colors of red. green, or white as shown.


The other was in wool with triangular pieces, pre-stuffed and sewn in what looks like a quilt as you go. The blocks are 4 triangles sewn together with 3 other like units to form a pin wheel. Then those blocks sewn together to form the quilt. Since these quilts were behind glass, I couldn't quite see exactly how those triangle units were made. It appears that the quilter started with squares, folded diagonally, filled then pieced together with the next triangle unit. The edges of the quilt look like this is exactly how they were formed. It would have been a warm quilt. The original recipient of this quilt was a young soldier in a Texas Calvary unit who survived the war.
If you ever visit Fort Worth, this museum is great and worth the visit. It's on the east side frontage road of Interstate 820 on the west side of Fort Worth. There is plenty to interest the males and the females of a family along with great descriptions of each item displayed.
I was particularly intrigued because part of the exhibit was about the "Sanitary Commission" organized by private citizens of the North to provide nursing care for the wounded. A number of years ago, at the Dallas Quilt show, I happened to be walking past the area set aside for appraising peoples quilts. A lady had brought in a particularly old family quilt that turned out to be made by women of the town of Skowhegan, Maine. The quilt was a Civil War quilt.
Each person adding blocks to the quilt had embroidered or hand-written their names on their blocks. As I recall, somewhere on the quilt it mentioned the Sanitary Commission. I think it was being donated to the Commission to use. I had wondered at the time what the Sanitary Commission was. Now I know. I do not know what became of the quilt but the quilt owner had been looking for a museum back East to donate the quilt to as she had no one to pass it on to and felt it was of historical significance. It had been in her family for generations.
That quilt really intrigued me because I have relatives that have lived in or near Skowhegan, ME for my whole life, including one who had been the town clerk for many years. I took some photos of that quilt but my skills with that camera at the time were not that great but I was able to make out names and sent several of the photos to my relative who recalled seeing many of those same names while she worked for the town. If I can find those pictures again, I'll look them over again and post them here. As I recall, it was a signature type block. Each block had been made individually, layered and then bound, then all sewn together to make the quilt; another "quilt as you go."
update: Since writing the above an hour ago, found a site via facebook of another blog that is about Civil War Quilts that may interest readers of this post.
One was an impressive log cabin style quilt (Barn Raising pattern) with embroidery done along the logs of the log cabins. Every log seemed to have the same embroidery stitch called the Herringbone stitch, a stitch usually used to decoratively sew two patches together but in this case used as a lovely edging stitch. The embroidery thread color of the dark "logs" varied with green, yellow, or red which highlights the embroidery. White appeared to be the primary embroidery thread used in the white "logs." The logs are in colors of red. green, or white as shown.The other was in wool with triangular pieces, pre-stuffed and sewn in what looks like a quilt as you go. The blocks are 4 triangles sewn together with 3 other like units to form a pin wheel. Then those blocks sewn together to form the quilt. Since these quilts were behind glass, I couldn't quite see exactly how those triangle units were made. It appears that the quilter started with squares, folded diagonally, filled then pieced together with the next triangle unit. The edges of the quilt look like this is exactly how they were formed. It would have been a warm quilt. The original recipient of this quilt was a young soldier in a Texas Calvary unit who survived the war.
If you ever visit Fort Worth, this museum is great and worth the visit. It's on the east side frontage road of Interstate 820 on the west side of Fort Worth. There is plenty to interest the males and the females of a family along with great descriptions of each item displayed.
I was particularly intrigued because part of the exhibit was about the "Sanitary Commission" organized by private citizens of the North to provide nursing care for the wounded. A number of years ago, at the Dallas Quilt show, I happened to be walking past the area set aside for appraising peoples quilts. A lady had brought in a particularly old family quilt that turned out to be made by women of the town of Skowhegan, Maine. The quilt was a Civil War quilt.
Each person adding blocks to the quilt had embroidered or hand-written their names on their blocks. As I recall, somewhere on the quilt it mentioned the Sanitary Commission. I think it was being donated to the Commission to use. I had wondered at the time what the Sanitary Commission was. Now I know. I do not know what became of the quilt but the quilt owner had been looking for a museum back East to donate the quilt to as she had no one to pass it on to and felt it was of historical significance. It had been in her family for generations.
That quilt really intrigued me because I have relatives that have lived in or near Skowhegan, ME for my whole life, including one who had been the town clerk for many years. I took some photos of that quilt but my skills with that camera at the time were not that great but I was able to make out names and sent several of the photos to my relative who recalled seeing many of those same names while she worked for the town. If I can find those pictures again, I'll look them over again and post them here. As I recall, it was a signature type block. Each block had been made individually, layered and then bound, then all sewn together to make the quilt; another "quilt as you go."
update: Since writing the above an hour ago, found a site via facebook of another blog that is about Civil War Quilts that may interest readers of this post.
Subscribe to:
Posts (Atom)